Supplies needed:
- a 20″ x 30″ piece of foam board ($2.88 at WalMart)
- 4 (20 pc.) adhesive velcro dots ($2.67 each at WalMart)
- 12-13 pcs of cardstock or other paper
- envelopes (for pieces)
- marker that shows up on board to draw calendar grid
- clear packing tape
- pencil & eraser
- scissors
- printer
- yardstick
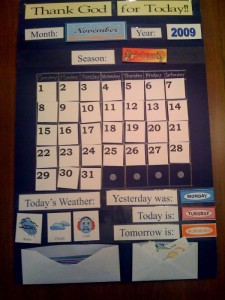
First, I made the pieces. I used MS Publisher, but you could do the same thing in MS Word. Most of my graphics came from office.microsoft.com’s free clip art. I inserted a table to put my images and text in so that they were easy to cut out and like items were all the same size.
I fit 12 days per page and 4 months per page. The rest, I fit all like items on one page. The text I eyeballed the font size, but most were 48-72 pt font size. You will need the following pieces:
- Months (12)
- Days of the Week (7)
- Years (I made this year and next year as Word Art)
- Dates (31)
- Seasons (4)
- Weather (rainy, windy, snowy, hot, cold, sunny, cloudy, partially cloudy, and stormy)
- Text that reads: Month: / Year: / Season: / Today’s Weather: / Yesterday was: / Today is: / Tomorrow is: / Thank God for Today!!
After you create the pieces, print them out onto cardstock. Cut out the pieces and lay them & the envelopes out on your foam board to get an idea of how you want to fit them together (see pic for example). After you lay your pieces out, approximate and then measure to draw the grid for the main calendar pieces. Mine ended up being about 2-1/4″ per square and had about 2″ margins.
Draw your grid in pencil first (I used a yardstick to make sure my squares were, well, square) and then after you are satisfied that it’s centered and fits your date pieces, draw over the lines with your marker. Add the names of the week.
Tape down your title & words (Month: / Year: / Season: / Today’s Weather: / Yesterday was: / Today is: / Tomorrow is: / Thank God for Today!!) with the packing tape. Then place the velcro dots (scratchy side) on the foam board, one for each spot where you will be putting a graphic piece (by month, by the year, etc.). Place the soft velcro pieces on your loose pieces that you will change out. Tape down the storage envelopes.
Make it yours! You could:
- buy a calendar pocket chart or bulletin board set BUT if you homeschool and want to do this year round, the calendars usually ignore summer. Otherwise, you can find those BB pre-made sets for about the same as building this. Less, if you already have stuff that will work around the house.
- Use whatever you have! Have a bulletin board you would rather use? Use colored paper instead of cardstock. Or scrap scrapbook paper? Or posterboard instead of foam board. The possibilities are endless!
- You could do a “I feel…” section instead of the envelopes.
- You could also keep the extra pieces somewhere other than on the board — in a file box nearby, perhaps.
- If you wanted it to be more secular, your title could simply be Calendar/Weather Station
- You could use something other than velcro…use permanent marker on a large magnetic white board & use magnets instead.
- Laminate the pieces and use the tacky poster stuff or tape.
- Add stickers or die cuts.
- Have different shapes of numbers for different months/seasons.
I understand that this is a little over my (not quite) 2 year old’s head, but she loves putting the pieces up and I’m sure it might sink in a little quicker. If not, she will at least be familiar with it!
Have you made or used one of these before? How did you make it yours? How did you use it? Share your tips in the comments!
5 Comments on Preschool Calendar / Weather Station
1Pingbacks & Trackbacks on Preschool Calendar / Weather Station
-
[…] Preschool Calendar / Weather Station […]

Barb
13 April 2011 at 3:35 PM (14 years ago)Thanks for posting this – Now that my 1/2 day nanny is also having one of our little girl’s friends come twice per week, we wanted to make some calendars, etc. to post up. Although they are both just around 2 years old, I think it’ll make a great piece for circle time discussions to familiarize them early on.
Thanks – I’ll become a crafty mom yet! 🙂
[Reply]
Holly Hamann
6 November 2009 at 11:36 AM (15 years ago)Hi Jen – Wow, you are so clever and creative. My kids are all teens now but I wish I would have created something like this when they were small. I found your blog through BlogFrog and wanted to come over and say congrats on your Premium membership. I hope you enjoy the traffic-driving benefits and don’t forget to check out the BlogStar Community (lots of expert blogging tips). If you ever have any questions or suggestions for how we can improve, please let us know. So nice to discover your blog!
Holly (BlogFrog)
[Reply]
Lori
5 November 2009 at 8:51 AM (15 years ago)Wow – that is a really great calendar! I’m impressed with your skills. My daughter would love that!
[Reply]
Amanda
5 November 2009 at 7:20 AM (15 years ago)Very cute Jen! What a crafty mama 🙂
[Reply]